piatok 22. decembra 2017

World map for Android MAPSGO

World map for Android MAPSGO .

Package download  HERE .

Unpack and

1)
 -  world_2_5.zip   copy to the android device in the osmdroid folder,
 -  C_Eur1.txt   copy to the android device in the GPStxt folder,
 -  Slovakia.pol, Czech.pol, Poland.pol  copy to the android device in the GPStxt folder,
 -  Cities.poi  copy to the android device in the GPStxt folder.

  And open with  MAPSGO  for Android.
  Zoom is 2 - 5 .


Or create *.pol file with text labels by the SHPtoMAPSGO for PC.

2)
 -  Countries.dbf,  Countries.shp, Countries.shx copy to the PC to some folder,
 -  Cities.dbf,  Cities.shp, Cities.shx copy to the PC to some folder,
 -  World.bmp,   World.bpw  copy to the PC to some folder.

  And open with SHPtoMAPSGO for PC.


3)
-  Create your own vector *.pol layers with SHPtoMAPSGO for PC.
-  Create your own vector *.lin layers with SHPtoMAPSGO for PC.
-  Create your own vector *.poi layers with SHPtoMAPSGO for PC.

-  Create your own points *.txt  with MAPSGO for Android.


Enjoy
JS

piatok 8. decembra 2017

Maperitive - create raster maps for the MAPSGO

Create your own raster maps for MAPSGO with Maperitive.

You can render your own maps from web maps.
You can change the script for to render the map - this is fine for to set your own road font size ...
Change the script in the folder ":\Maperitive\Rules".


It is possible to create mbtiles or zip map format for MAPSGO with Maperitive.

Download Maperitive HERE . Unzip the file, and run Maperitive.exe.


MBTILES map file for MAPSGO:

1. Zoom to the area of your choice. Add web map.

2. Set Geometry Bounds for your area.

3. Zoom-out with the mouse wheel to see the selected area. You can modify the rectangle.

4. Download OSM data for selected area. Wait until the OSM data will be downloaded from the server.

5. Enter to the Command promt on the bottom of the page :  generate-mbtiles minzoom=12 maxzoom=17  (or your own zoom) and press Enter key.
   Wait until the red "RUNNINGA TASK ... PRESS ESC TO ABORD" will disappear and "DONE" will be in the bottom Commander window.


6. The file map.mbtiles has been created in the folder ":\Maperitive\Tiles".  Rename the file to somename.mbtiles and copy the file to the Android device in the osmdroid folder.
Open it with MAPSGO .


ZIP map file for MAPSGO:

Use the steps 1 - 4 above.

5. Enter to the Command promt on the bottom of the page :  generate-tiles minzoom=12 maxzoom=17  (or your own zoom).
   Wait until the red "RUNNINGA TASK ... PRESS ESC TO ABORD" wanish and "DONE" will be in the bottom Commander window.


6. The folders 12-17 (or your own) have been created in the folder ":\Maperitive\Tiles".

7. Create the empty folder Mapnik , move the folders 12-17 to the Mapnik folder.

8.Create the zip file from Mapnik folder. You can choose any name of the zip file. Copy the zip map file to the Android device in the osmdroid folder.
Open it with MAPSGO .


Vytvorte vlastné rastrové mapy pre  MAPSGO pomocou Maperitive.

Pomocou Maperitive môžete vytvoriť vlastné rastrové mapy pre MAPSGO (mbtiles alebo zip).
Výhodou oproti MOBAC-u je:
* použitie vlastného zoomu, ktorý MOBAC neposkytne.
* jednoduchšia tvorba zip map súboru pre MAPSGO ako v MOBACu.
* môžete upraviť skript, ktorý tvorí mapu (použitie vlastnej velkosti fontu pre názov ulíc ...) .


Stiahnite Maperitive     TU .    Netreba inštalovať - rozzipujte a spustite  "Maperitive.exe".


MBTILES map súbor pre MAPSGO (viď obrázky vyššie):

1. Zobrazte výber mapy posunom a zoomovaním (View-ZoomIn, ZoomOut). Pridajte príslušný druh mapy (Tools-Add web map).

2. Zadajte ohraničenie výrezu spracovania (Map-Set Geometry Bounds).

3. Použite oddialenie (View-ZoomOut), aby bolo vidno zobrazené ohraničenie výrezu. Upravte rozsah výrezu - potiahnite myšou boky alebo rohy výrezu.

4. Stiahnite zo servera dáta pre zobrazený výrez (Map-Download OSM data).  Čakajte pokial sa dáta nestiahnu.

5. Na spodu programového okna je "Command promt:" - do políčka napíšte:   generate-mbtiles minzoom=12 maxzoom=18     (alebo vlastný zoom).
   Čakajte pokial nezmizne červený nápis "RUNNINGA TASK ... PRESS ESC TO ABORD" a "DONE" sa objaví v okne Commander .

6. Súbor map.mbtiles has sa vytvorí v adresáry  ":\Maperitive\Tiles".
    Premenujte súbor na  VášNázov.mbtiles a nakopírujte súbor do Androidu do adresára osmdroid .


ZIP map súbor pre MAPSGO  (viď obrázky vyššie): 

1. Urobte kroky 1 - 4 popísané vyššie.

2. Na spodu programového okna je "Command promt:" - do políčka napíšte:   generate-tiles minzoom=12 maxzoom=18    (alebo vlastný zoom).
   Čakajte pokial nezmizne červený nápis "RUNNINGA TASK ... PRESS ESC TO ABORD" a "DONE" sa objaví v okne Commander . 

3. Adresáre 12-18  (alebo s Vašim zoomom) sa vytvoria v adresry ":\Maperitive\Tiles".

4. Založte prázdny adresár Mapnik , presunte do neho adresáre 12-18. Vytvorte zip súbor z adresára Mapnik.   Názov zip súboru je lubovolný. Nakopírujte zip súbor do Androidu do adresára osmdroid .


Enjoy
JS

nedeľa 19. novembra 2017

SHPtoMAPSGO - create vector maps for the MAPSGO

  SHP do MAPSGO a Map_ax.
- vytvor vektorové súbory pre  MAPSGO  a MAP_ax ,
- otvor a zobraz MapsGo a Map_ax vektorové súbory v mape.             

  SHP to MAPSGO and Map_ax.
- create  vector  files for  MAPSGO  and MAP_ax ,
- open and display  MapsGo and Map_ax vector files  on the map.


- - - - -  Slovensky - - - - -  

Program stiahni tu:   Download SHP_MGMX 
Môžeš použiť tlačidlo: "Stiahnuť pomaly zadarmo".
Rozzipuj a nainštaluj podľa Readme.txt.

Základné programové okno (o1).

1:   Otvor WGS raster (bmp/bpw, tif/tfw, jpg/jgw) alebo shp mapu.
2:   Posun mapy.
3:   Zväčšenie.
4:   Zmenšenie.
5:   Celá mapa.
6:   Info o shp vektoroch.
7:   Ukazovatel šípka.
8:   Vyčisti mapové okno.
9a:  Vytvor MGo and MAx *.lin súbor zo shp vektora.
9b:  Vytvor MGo and MAx *.pol súbor zo shp vektora.
9c:  Vytvor MGo and MAx *.poi súbor zo shp vektora.
10:  Vytvor MGo and MAx  *.txt , *.poi , *.lin , *.pol z naklikaných bodov nad mapou.
11a: Otvor MGo and MAx *.txt súbor s názvom bodov.
11b: Otvor MGo and MAx *.txt súbor s poznámkou k bodom.
12a: Otvor MGo and MAx *.poi súbor.
12b: Otvor MGo and MAx *.lin súbor.
12c: Otvor MGo and MAx *.pol súbor.
13:  Zatvor program.
14:  Mapové okno.

Vytvor MGo and MAx *.lin, *.pol, *.poi súbor zo shp vektora (o2).

0:  Otvor shp súbor.
1:  Klikni na ">lin" alebo ">pol" alebo ">poi".
2:  Klikni na "i" (2).
3:  Klikni na polygón, líniu alebo bod (vyber šírku výberu myši 5).
4a: Klikni a vyber zobrazovanú databázovú položku (pri polygonoch a bodoch).
4b: Poradové číslo zobrazovanej databázovej položky.
5:  Vyber šírku výberu myši.
6:  Zobraz vybratú popisku (4) v mapovom okne.
7:  Font popisky zobrazenej v mapovom okne.
8:  vytvor MGo and MAx *.lin, *.pol, *.poi súbor.
9:  Zatvor okno.

Vytvor MGo and MAx  *.txt , *.poi , *.lin , *.pol  súbor z naklikaných bodov nad mapou.
Nemanuálne (o3a).

0: Otvor WGS raster (bmp/bpw, tif/tfw, jpg/jgw).
1: Klikni na ">txt".
2: Noedit - nemanuálne vytváranie naklikaných bodov.
3: Klikaj ľavým tlačidlom myši na vybrané miesta mapového okna.
4: Zobrazenie súradníc klikaných bodov.
5: Výpočet vzdialenosti a výmery medzi naklikanými bodmi.
6: Klikni na "+txt" alebo "+lin" alebo "+pol" a vytvor súbor.
7: Vymaž zoznam bodov.
8: Zatvor okno.

Vytvor MGo and MAx  *.txt , *.poi , *.lin , *.pol  súbor z naklikaných bodov nad mapou.
Manuálne (o3b).

0: Otvor WGS raster (bmp/bpw, tif/tfw, jpg/jgw).
1: Klikni na ">txt".
2: Edit - manuálne vytváranie naklikaných bodov.
3: Klikaj ľavým tlačidlom myši na vybrané miesta mapového okna.
4: Doedituj ručne oddelovače vektorových prvkov xxx - viď štruktúru príslušného vytváraného súboru poi, pol, lin (5). 
5: Štruktúra príslušného vytváraného súboru poi, pol, lin.
6: Klikni na "+poi" alebo "+lin" alebo "+pol" a vytvor súbor.
7: Vymaž zoznam bodov.
8: Zatvor okno.


Viac o tvorbe vektorových súborov pre MAPSGO a Map_ax pozri aj   TU.  


- - - - -  English - - - - - 

Download app here:   Download SHP_MGMX 
You can use: "Slow download for free".
Unzip and instal. Look at  Readme.txt.

Basic program window (o1).

1: WGS raster opening (bmp / ​​bpw, tif / tfw, jpg / jgw) or shp map.
2: Map pan.
3: Zoom in.
4: Zoom out.
5: Whole map.
6: Info about shp vectors .
7: Arrow pointer.
8: Clear map window.
9a: Create MGo and MAx * .lin file from shp vector.
9b: Create MGo and MAx * .pol file from shp vector.
9c: Create MGo and MAx * .poi file from shp vector.
10: Create MGo and MAx * .txt, * .poi, * .lin, * .pol from clicked points above the map.
11a: MGo and MAx * .txt file with the name of points.
11b: MGo and MAx * .txt file with the note of points.
12a: Open MGo and MAx * .poi file.
12b: Open MGo and MAx * .lin file.
12c: Open MGo and MAx * .pol file.
13: Close program.
14: Map window.

Create MGo and MAx * .lin, * .pol, * .poi file from shp vector (o2).

0: Open shp file.
1: Click on ">lin" or ">pol" or ">poi".
2: Click on "i" (2) .
3: Click on a polygon, line or point - select mouse selection width (5) .
4a: Click and select the displayed database item (for polygons and points) .
4b: Serial number of the displayed database item.
5: Select mouse selection width.
6: Display selected label (4) in the map window.
7: Font of the label displayed on the map window.
8: Create MGo and MAx * .lin, * .pol, * .poi file.
9: Close the window.

Create MGo and MAx * .txt, * .poi, * .lin, * .pol file from clicked points above the map. 
Non-manually (o3a).

0: WGS raster opening (bmp / ​​bpw, tif / tfw, jpg / jgw).
1: Click on ">txt".
2: Noedit - non-manual creation of clicked points.
3: Left-click on selected locations of the map window.
4: Display of coordinates of clicked points.
5: Calculate the distance and area between clicked points.
6: Click on "+txt" or "+lin" or "+pol" and create a file.
7: Clear the list of points.
8: Close the window.

Create MGo and MAx * .txt, * .poi, * .lin, * .pol file from clicked points above the map. 
Manually (o3b).

0: WGS raster opening (bmp / ​​bpw, tif / tfw, jpg / jgw) .
1: Click on ">txt".
2: Edit - manual creation of clicked points.
3: Click with the left mouse button on selected places of the map window.
4: Edit the delimiters of vector elements xxx manually - see the structure of the respective created file poi, pol, lin (5).
5: Structure of the respective poi, pol, lin file to be created.
6: Click on "+poi" or "+lin" or "+pol" to create a file.
7: Delete the list of points.
8: Close the window.


More about vector files for MAPSGO and Map_ax  look also    HERE.  


Enjoy
JS

štvrtok 16. novembra 2017

MOBAC - create raster maps for the MAPSGO

Create your own raster maps for MAPSGO with Mobile Atlas Creator 

1. Download and instal MOBAC to PC.


2. Create the map zip file (png tiles in it) with MOBAC. You can also create "osmdroid sqlite", "MBTiles SQLite" or "osmdroid GEMF".

3. Prepare the map zip or sqlite file for the MapsGo, change the provider to Mapnik and copy it to the Android on the external memory in the osmdroid folder. Look at my "MAPSGO-Android offline maps" blog how to change the name of the provider in "zip" and "sqlite" map file format.
MBTiles and GEMF map formats are created properly.


4. Find where is located the new map zip or sqlite in the MAPSGO.


MAPSGO works with the zoom:  2 - 22 .


Enjoy
JS

MAPSGO - Android offline maps

MAPSGO - Android offline maps


MAPSGO 4.0 supports point text labels and polygon text labels.

You can use MAPSGO Android for to:


- display raster maps ( map files:  zip , sqlite , mbtiles , gemf ),
- display vector map layers (as a special files - like the txt files),
- display points and save the list of the points as txt files,
- create vector layers (points, lines, polygons),
- display point and polygon labels,
- create project files from vector layers,
- measure the distance (km) and the area (ha),
- GPX import export (wpt's),
- work with GPS.


You can create your own offline raster maps or vector map layers with:
- Mobile Atlas Creator - MOBAC ( create raster map files: zip , sqlite , mbtiles , gemf ).
- Maperitive ( create raster map files: zip , mbtiles).
- QGIS Desktop (use QMetaTiles modul and create raster zip map file from tif/tfw, jpg/jgw).
- MAPC2MAPC (use OSMDROID sqlite and create raster sqlite map file from tif/tfw, jpg/jgw).
- MAPC2MAPC (use MBTiles sqlite and create raster mbtiles map file from tif/tfw, jpg/jgw).
- MAPC2MAPC (use GEMF Format and create raster gemf map file from tif/tfw, jpg/jgw).
- SHPtoMAPSGO (convert shp to MapsGo vector map layers).

MAPSGO uses WGS84.


Raster map files are in the "osmdroid" folder in the Internal (shared) storage  (no micro SD card).
The point txt files and special vector map files are created in the "GPStxt" folder in the Internal (shared) storage  (no micro SD card).
In the "GPStxt" folder is created also geopoint.txt where are saved map shots ,  geopoint.dat where is the last map shot when the MAPSGO is closed and project.prj with vector layers.

"GPStxt" folder and "osmdroid" folder are created when the app is started first time.
Some Android devices have problem to open these folders from desktop PC after connection by USB cable.
Problem solution can be to rename the folders to    "GPStxtn"   "osmdroidn"   and after that rename them again to "GPStxt"  "osmdroid"    directly in the Android device.

"Location" has to be "Set On"  (Settings - Location - On).

The device has to have the sensor of Orientation for calculation of Azimut.


-------------------------------------------------------------------------------------------
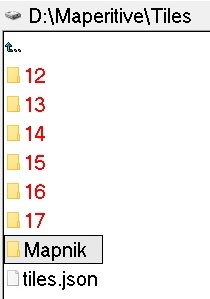
Structure of the map zip file:
- you can use any name of the zip file (shorter names are better),
- the name of the entire zip archive (Tileset name) must be  Mapnik ,
- in the zip file are png tiles.


Structure of the map sqlite file:
The Provider must be Mapnik  .
If you create the sqlite map file with MOBAC (use osmdroid sqlite) - open it with SQLiteStudio and change the Provider to Mapnik.
Set Mapnik as the provider in  MAPC2MAPC in Settings-General .


-------------------------------------------------------------------------------------------
Structure of the vector map layers (polygons , lines , points) :

Vector files for MAPSGO are simple txt files with the end of files *.pol , *.poi, *.lin .
The *.pol , *.poi, *.lin  files are in the GPStxt folder.
You can create them with the Notepad,
or
You can convert the shp map files to the MapsGo vector map layers by SHPtoMAPSGO .

More about vector files creation for MAPSGO look also     HERE.  

Example of poly.pol file
In the *.pol file are the coordinates of the points of the polygons, separated with the xxx line.

Non labeled polygons

Labeled polygons.

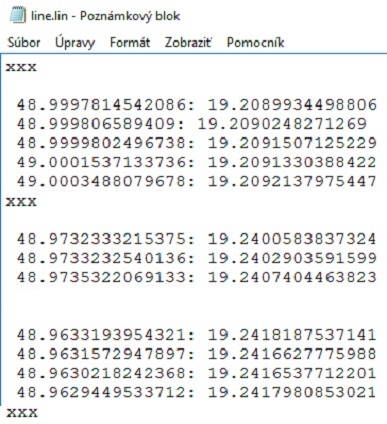
Example line.lin file
In the *.lin files are the coordinates of the points of the lines,  separated with the xxx line.

Example point.poi file
point name:latitude:longitude
-------------------------------------------------------------------------------------------

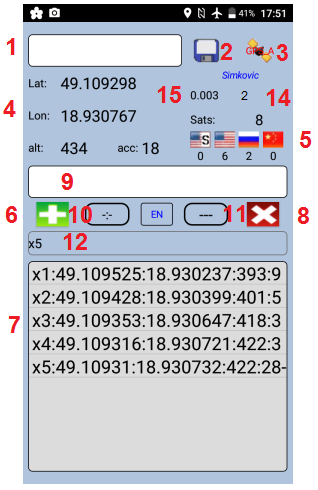
Structure of the point map layer  :

Points are gathered to the list with the GPS or from the map and the list of points is saved as *.txt file in the GPStxt folder.
You can create the vector layers (polygon, line, point vector layers) from these points.
Structure of the point txt file is:     
poi_name:latitude:longitude:altitude:accuracy:note

More about MAPSGO will be in the next blogs.

MAPSGO_L is the lite version and you can:
* save max 5 points in the txt, gpx file,
* open only first 5 txt, gpx point files,
* create vector files from 5 points max,
* open only first 5 vector files,
* measure the distance and area between max 5 points.

Download free lite version as APK    (ver.4.8):     HEREdownload .

Privacy policy.
"MAPSGO" APP uses the GPS only for to the gather the coordinates with GPS for offline map purpose. This APP do not send the coordinates to another persons nor devices.

Manual English ver.4.8 (pdf)  is:                            HEREmanual .

Prirucka   SK     ver.4.8 (pdf)  is:                            TuPrirucka .


How to instal MAPSGO ?
1) Instal downloaded APK.
2) Start MAPSGO. After instalation - "osmdroid" folder will be created in the Internal (shared) storage  (no micro SD card).
3) Copy maps (zip , sqlite , mbtiles , gemf)  to the osmdroid folder.
     (sqlite map for MAPSGO is different from sqlite map for the LOCUS)
4) Find the location on the map by the MapShots icon and save it by "+" button..

--------------------------------------------------------------------

MAPSGO - Android offline mapy

MAPSGO sa dá použiť na:
- zobrazenie rastrových máp ( zip , sqlite , mbtiles , gemf  mapové súbory),
- zobrazenie vektorových vrstiev (špeciálne súbory na txt báze),
- zobrazenie a uloženie bodov do txt súboru,
- zobrazenie bodových a polygonových popisiek,
- tvorba vektorových vrstiev (body, línie, polygony),
- tvorba projektových súborov pre vektorové vrstvy,

- zisťovanie vzdialenosti (km) a výmery (ha),
- GPX import a export (waypointy),
- prácu s GPS .

O tvorbe vlastných vektorových súborov pre MAPSGO pozri     TU     a      TU.  

MAPSGO používa WGS84.

MAPSGO_L je lite verzia s ktorou môžete:
* uložiť maximálne 5 bodov do txt, gpx súboru,
* otvoriť prvých 5 txt, gpx bodových súborov,
* vytvoriť vektorové súbory z max 5 bodov,
* otvoriť prvých 5 vektorových súborov,
* merať vzdialenosť a výmeru medzi max 5 bodmi.

Viac o MAPSGO - sledujte ďalšie príspevky na blogu.

Stiahnite zdarma lite verziu vyššie kliknutím na HEREdownload.
Slovenčinu vyberte v nastaveniach - Klik na "Nastav" a klik na "EN".

Pravidlá ochrany súkromia.
Táto aplikácia používa GPS len pre účely offline mapovania.
Aplikácia neposiela súradnice pre iné osoby ani zariadenia.


Inštalácia MAPSGO :
1) Nainštaluj stiahnutú APK.
4) Spusti MAPSGO. Po inštalácii  - vytvorí sa "osmdroid" adresár na Internom (zdielanom) úložisku (nie na SD karte).
5) Nakopíruj mapy (zip , sqlite , mbtiles , gemf)  do "osmdroid" adresára.
     (sqlite mapa pre MAPSGO má iný formát ako sqlite mapa pre LOCUS).

"GPStxt" adresár a "osmdroid" adresár sa vytvorí po prvom spustení programu.
Niektoré Android prístroje majú problém otvoriť tieto adresáre zo stolného počítača pripojeného cez USB kábel.
Riešením môže byť premenovanie na "GPStxtn"    "osmdroidn"   a  opätovné premenovanie na "GPStxt"    "osmdroid"    priamo v Android prístroji.

"Poloha" musí byť "Zapnuté"  (Nastavenia - Poloha- Zapnuté).

Enjoy
JS

pondelok 13. novembra 2017

Puzzle Android game

Puzzle Android game.

I have done this little familiar game for my children.


Tap, hold and move the part of the picture
to the right field
to assemble the picture.

You can download the APK file for free  HERE .

You can download the APK file for Android TV HERE .

You need Bluetooth Air Mouse for Androit TV app.


Enjoy
JS

----------------------------------------------

Puzzle Android hra.

Známa hra.
Podrž ústrižok obrázku
a premiestni ho do správneho poľa,
aby si zložil celý obrázok.

Stiahnite APK súbor zdarma - vyššie kliknutím na "HERE".

nedeľa 12. novembra 2017

Different Pictures - Android game

Different Pictures - Android game.

I have done this little familiar game for my children.
I think the help is not to be needed.
Find 10 differences.


You can download the APK file for free  HERE .

You can download the APK file for Android TV HERE .
You need Bluetooth Air Mouse for Androit TV app.

Enjoy
JS

----------------------------------------------

Rôzne obrázky - Android hra.

Známa hra kde sú dva obrázky a treba hladať rozdiel.
Myslím, že návod netreba.
Nájdite 10 rozdielov.

Stiahnite zdarma APK súbor vyššie - kliknutím na "HERE".
Bez reklamy.

sobota 11. novembra 2017

GPSGO for Android

GPSGO - GPS_txt_gpx for Android.


I have made this little APP  for to gather:

point name
coordinates
altitude
accuracy (date_time in txt)
point note

of the points

and

save them as "txt" and "gpx" file in "GPStxt" folder in the Internal (shared) storage  (no micro SD card).

"GPStxt" folder is created when the app is started first time.
Some Android devices have problem to open this folder from desktop PC after connection by USB cable.
Problem solution can be to rename the folder to    "GPStxtn"  and after that rename it again to "GPStxt"  directly in the Android device.

"Location" has to be "Set On"  (Settings - Location - On).

The azimut and slope is not calculated if the device has not the sensor of the Orientation.


You can download it HERE .

Privacy policy.
"GPSGO" APP uses the GPS only for to the gather the coordinates with GPS for offline purpose. This APP do not send the coordinates to another persons nor devices.
1. Type the file name. If blanc then datetime name.
2. Save as "txt" and "gpx" file.
3. Tap to GPS On-Off.
4. Latitude, longitude, altitude, accuracy.
5. Number of sats (US-Sbas, US, Rus, Chin).
6. Add to list of the points. * Use also Volume buttons.
7. List of the points. Long press to delete row.
8. Clear the list of the points.
9. Type the point name. If blanc then x1,x2 ... .
10. Compass (tap or long press).
11. Slope (tap).
12. Tap to open the window of the point notes.
13. Window of notes.
14. Speed in km/hour.
15. Flying distance from choosen list point (7) in km.

Notes - tap on label (12).
* Tap on label (12) - open the window (13) of the point notes.
* Tap on the row (7) and chose the point for note edit.
* Edit the note in the textbox (13). Tap again on label (12) to save the note .
* Save as "txt" or "gpx"  file (2).


---------------------------------------------------------------------------------------------------------

GPSGO - GPS_txt_gpx pre Android.

Program ukladá údaje z GPS (názov bodu, Lat, Lon, NMV, Presnost, Poznámka) do “txt” a "gpx"súboru na externú pamäť do adresara "GPStxt".

"GPStxt" adresár sa vytvorí po prvom spustení programu.
Niektoré Android prístroje majú problém otvoriť tento adresár zo stolného počítača pripojeného cez USB kábel.
Riešením môže byť premenovanie na "GPStxtn" a  opätovné premenovanie na "GPStxt" priamo v Android prístroji.

"Poloha" musí byť "Zapnuté"  (Nastavenia - Poloha- Zapnuté).

Stiahnite vyššie kliknutím na "HERE".

Pravidlá ochrany súkromia
Táto aplikácia používa GPS len pre účely offline .
Aplikácia neposiela súradnice pre iné osoby ani zariadenia.

Kliknutím na “GPS_N” - GPS neaktívna (3) sa zmení stav na “GPS_A" - GPS aktívna a GPS začne prijímať údaje.
***
V časti (5) Sats: sa zobrazuje počet satelitov prijímajúcich signál.. Ak je číslo 0 tak sa údaje ešte neprijímajú. Zobrazí sa aj počet satelitov podľa druhu: US satelity SBAS, US satelity, Glonass (Ruské), Beidou (Čínske).
***
V časti (4) sa zobrazujú prijímané údaje satelitov.
***
Kliknutím na tlačidlo "+" (6) sa ukladajú údaje do spodného okna.
Ak sa vyplní v textovom okne (9) názov bodu, tak sa uloží bod s vyplneným názvom.
Ak sa nevyplní, tak sa uloží názov "x_poradové číslo".
Ak sa vyplní len jeden znak, napr. "a" tak sa ukladá "a_poradové číslo".
***
Ak sa podrží prst na riadku (7) tak sa vymaže príslušný riadok s údajmi.
***
Kliknutím na tlačidlo "X" (8) sa vymaže celý zoznam bodov (7).
***
Zosnímané údaje zobrazené v spodnom okne je možné uložiť na externú pamäť do adresara "GPStxt". Do textového políčka (1) sa napíše názov súboru.
Ak sa názov súboru nenapíše, tak sa súbor uloží pod názvom "dátum_čas".
Klikne sa na tlačidlo (2) a uloží sa ako txt a gpx súbor.
***
Kliknutím na "GPS_A" (3) sa zmení stav na "GPS_N" - GPS neprijíma údaje. Kliknutím na "GPS_N" sa zmení stav na "GPS_A" - GPS prijíma údaje.
***
Kliknutím na tlačidlo (10) sa aktivuje kompas - ukazuje svetové strany. Znovu kliknutím sa deaktivuje.
Podržaním prsta na tlačidle (10) sa aktivuje kompas - ukazuje azimut. Znovu podržaním sa deaktivuje.
Kliknutím na tlačidlo (11) sa aktivuje sklonomer - ukazuje sklon tela telefónu. Znovu kliknutím sa deaktivuje.

Kliknutím na tlačidlo (12) sa otvorí / zatvorí poznámkové okno (13).

V okne (14) sa zobrazuje rýchlosť pohybu v km/hod.
V okne (15) sa zobrazuje priama vzdialenosť od zvoleného bodu v zozname (7) v km.

Poznámky - Klikni na tlačidlo (12).

* Klikni na návestie (12) – otvorí sa poznámkové okno (13) .
* Naedituj poznámku do okna (13).
* Vpíš názov bodu (9). Ak sa názov nenapíše bod sa označí x1,x2 ...
* Klikni na tlačidlo „+“ (6) – bod aj s poznámkou sa zaradí do zoznamu bodov.
* Postupne ukladaj ďalšie body.
* Ak je poznámkové okno (13) zatvorené - klik na návestie (12), tak sa ukladajú body bez poznámok.
* Ulož ako“ txt“ alebo "gpx" súbor (2).


Enjoy
JS